It is available now for download. For those of you who having the following issues, please find yourself this update with this Rollup 2 release :-
The URL links to incidents or activities in the Notification Templates are incorrect. For more information about this issue, go to the following Microsoft TechNet website:
I have conducted a web seminar for 'Microsoft Partner Readiness Webminar' Module 2a which focusing on working with Hyper-V 3 with Powershell.
In my first demo 'Demo1', I have showed to the audience on how we could rapidly deploy VMs Without the use of:- 1. Hyper-V Manager 2. System Center Virtual Machine Manager
The Power of Powershell in managing VMs in Hyper-V
Most of us thought that with the Hyper-V Manager, we could do most of the administrative tasks easily. Well, time to rethink if you have hundreds (if not thousands) of VMs running on you Hyper-V infrastructure and you have to do the following :- 1. To find out the Startup Memory, Minimum Memory and Maximum Memory each VM 2. To find out vCPU count of each VM 3. To find out the vSwitch and VLAN ID each VM connected
With the few tasks as listed, immediately we know how complicated things going to be, and a good example is that we have to right-click each and every VM, properties just to find out these information.
Let think this through with Powershell, you could simply use these to solve the tasks above :- 1. Get-VMMemory -VMNAME <vmname> | ft vmname, startupmemory, minimummemory, maximummemory 2. Get-VMProcessors -VMNAME <vmname> | ft vmname, count 3. Get-VMnetwork
How Aboout Bulk Creating VMs ?
Yes ! Of course we can do that, in fact there are numerous ways in getting this done. In this blog I am going to share with you how we pre-defined the VMs configuration in an CSV spreadsheet and then use powershell to created alll these VMs.
I have change the script I shared last at http://ariessysadmin.blogspot.com/2011/12/how-to-rapid-deploy-vm-using-powershell.html How-To: Rapid Deploy VM Using Powershell to the following
#BulkCreateVMs.ps1 $vmdefaultpath = "D:\VMs" $ParentVHD = "D:\Hyper Base\WIN2K8R2SP1_Ent_Sysprep_180days_Updated20120404.vhd" $path = "D:\vms\VMs.csv" import-csv -path $path|ForEach-Object { $erroractionpreference = 0 $vmName = $_.Name [int] $vmmemory = $_.Memory $vmstartmemory=$vmmemory*1073741824 $vmcpucount = $_.Cpucount $vmSwitch = $_.Network $vmpath = $vmdefaultpath #Create the VM New-VM -Name $vmname -Path $vmdefaultpath #Set the VM Memory properties Set-VM -Name $vmname -StaticMemory -MemoryStartupBytes $vmstartmemory #Set the vCPU Set-VMProcessor -VMName $vmname -Count $vmcpucount #Connect the VM to vSwitch Connect-VMNetworkAdapter -VMName $vmname -SwitchName $vmSwitch #Create VHD for the VM New-VHD -Path $vmpath\$vmname\$vmname.vhd -ParentPath $ParentVHD #Add the VHD to the VM to IDE 0 Location 0 Add-VMHardDiskDrive -vmname $vmname -ControllerType IDE -ControllerNumber 0 -Path $vmpath\$vmname\$vmname.vhd Write-Host -BackgroundColor Green -ForegroundColor Black "Virtual Machine $vmname has been successfully created" }
The script above:- 1. Reads all VM configuration listed in VMs.csv and create in Hyper-V 3 host 2. Stores all VMs configuration files, snapshots, and VHDs in D:\VMs\ 3. Creates diferrencing disk for each VMs with the Parent VHD in D:\Hyper Base\ 4. Creates VMs with static memory
You have to change this script properties to suit your environment if you plan to use this.
Below is the video i have captured, showing how the script works for my demo.
How to Create L2TP/IPSec VPN Connection in Windows 7
Before you could establish a L2TP/IPSec connection to VPN Server, it is important for you to check if the computer you are dialing does have all the necessary certificates. You may visit my blog Create L2TP/IPSec Certificate for TMG 2010 using Enterprise CA which I mentioned all the steps to import certificates from CA to your computer.
1. Right click on Network Connection at the task bar and select Open Network and Sharing Center
2. Select Connect to a Network. Click Next
3. Select Connect to a Workplace. Click Next
4. Select No, create a new connection. Click Next. (This only if you have other connection)
5. Select Use my Internet connection (VPN)
6. Type in the VPN server IP or FQDN
7. Give the connection a name
8. Check Don't connect now, just set it up so I can connect later. Click Next
9. Type in the credential. Click Finish
10. Right click the connection you have created. Select Properties
11. At the Options tab, uncheck include Windows logon domain
12. At the Security tab:-
Type of VPN : Layer 2 Tunnelling Protocol with IPSec (L2TP/IPSec)
Data encryption: Optional encryption (connect even if no encryption)
only check Microsoft CHAP Version 2 (MS-CHAP v2) (you may have differences setting compare to mine. Refer to you VPN administrator for the correct authentication protocol)
Click Advanced settings. Check Verify the Name and Usage attributes of the server's certificate
13. At the Networking tab, uncheck Internet Protocol Version 6 (TCP/IPv6)
14.Select Internet Protocol Version 4 (TCP/IPv4). Click Properties
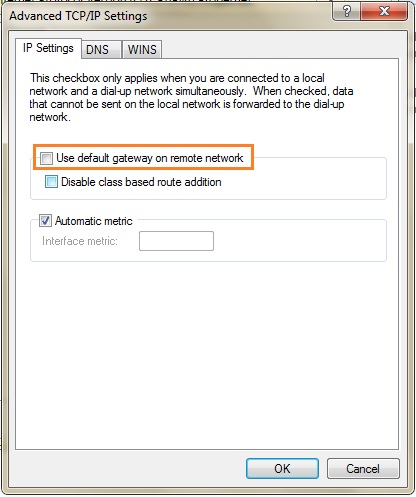
15. Uncheck Use default gateway on remote network. (This will prevent you network traffic being route to the remote gateway)
16. Click OK
17. Click OK to close the connection Properties page
18. Double click the connection you have created. Click Connect
19.Upon connection established, verify the connection Details